If you’ve ever wanted to host your own cloud storage system instead of relying on Dropbox or Google Drive, then follow this step-by-step guide to sync all of your Android devices with your home PC.
I’ll be the first to admit that I’m a slacker when it comes to organizing and backing up my photos. I can spend months taking photos, but I rarely bother to backup them on my PC or a cloud storage service as I go.
When I finally get around to it, I frequently end up spending a significant amount of time sifting through endless folders to figure out what I need to backup, as well as waiting for tedious broadband upload speeds and agonizingly slow Bluetooth connections. It takes even longer if I want to transfer my photos and other files to my tablet afterward.
When it comes to syncing your photos and videos across your various smartphones, tablets, PCs, and laptops, there are a few options. Dropbox, Picasa, and even Google Photosync are all viable options for certain scenarios, but they aren’t ideal when you need super fast transfer speeds for large files or want to sync photos across multiple accounts and platforms.
There must be a simpler solution for the forgetful photographer in this day and age of fast, wireless technologies. This is where your personal FTP server comes in handy. By using your PC as your own cloud storage system, you can set up automatic syncing across an unlimited number of devices using any number of individual user accounts, access much faster Wi-Fi transfer speeds, and avoid those pesky storage limits.
For my home setup, I have my smartphone photos scheduled to upload to my PC’s external hard drive once a week, so I won’t lose them if my PC fails. All of these files are then automatically synced to my tablet, allowing me to browse through them while sitting on my sofa with a cup of tea. I can also access my FTP folder while I’m out and about using my 3G data connection, as long as my PC is turned on.
It’s very convenient, so let me show you how to set it all up.
Table of Contents
What you’ll need
- A wireless router that can be configured Windows XP, Vista, or 7 PC or laptop with some free space
- A folder on your computer or external hard drive where you want to sync photos to and from
- Installed the FileZilla Server application on your Windows machine
- FolderSync Lite installed on an Android smartphone or tablet
Installing the Server
Begin by downloading and installing the Filezilla Server on your computer – simply use the default installation options. You’ll probably want the service to start up automatically so that you can transfer files whenever you need to, so leave the default option alone unless you want to manually start up your server.
When the server application starts, you’ll be prompted for a server address, port, and password. Leave everything alone except for a password and the “always connect to this server” option, unless you intend to run multiple FTP servers.
Now that your server is up and running, you should be able to connect to it from any other device. The next step is to create users and assign them access to specific folders. If you want to separate some of your files, you can create multiple users and different folders.
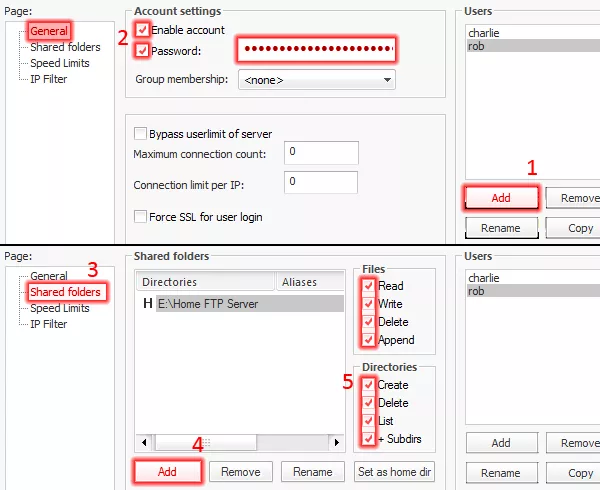
Click “Edit,” then “Users,” and you’ll see the screen shown above. Continue by pressing “Add” and then entering the user name. Make sure “enable account” is checked, and I recommend creating a password to make it more difficult for unauthorized people to access your files.
Then, go to the shared folders page and choose the directory where you want to sync your entire photo collection. Give yourself all permissions, marked 5, so that you can create new folders and files as needed. If you don’t want these file transfers to consume all of your Wi-Fi bandwidth, you can add multiple sharing locations and adjust the upload and download speed limits. When you’re finished, click OK.
Your server is setup and ready to go.
Windows Firewall
Firewalls are the bane of the FTP server’s existence, but since we’re only concerned with setting up a Wi-Fi network right now, you shouldn’t have too many issues.
Filezilla must be added as an exception in the Windows Firewall program. The firewall settings can be found in the control panel of your computer. You must then add a program to the exceptions list by navigating to the Filezilla server installation folder, which is typically C:\Program Files\FileZilla Server\FileZilla server.exe.
If you have anti-virus software that acts as a firewall, you should allow Filezilla access there as well. After that, you can proceed to test the connection.
Setting up your mobile
Now comes the fun part: download FolderSync Lite from the Google Play store to access and sync files via your FTP server. If you want to integrate with other accounts, it also works with a plethora of other cloud storage servers.
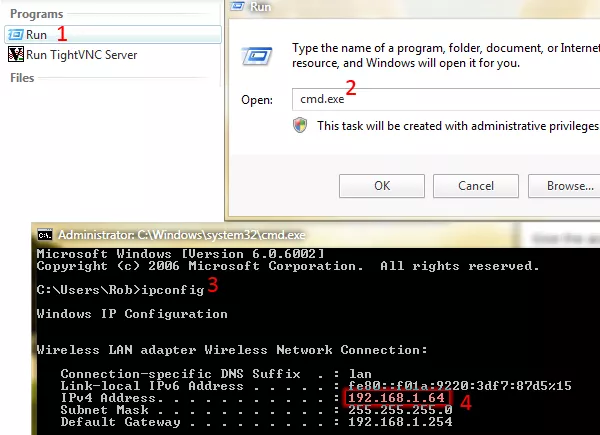
You’ll need to know your host PC’s WLAN IP address, so open a command window and type “ipconfig.” For a step-by-step guide, see the image below.
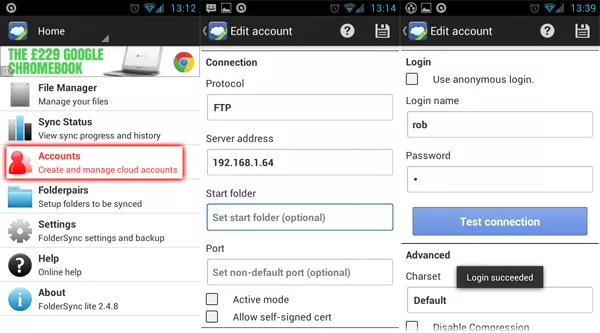
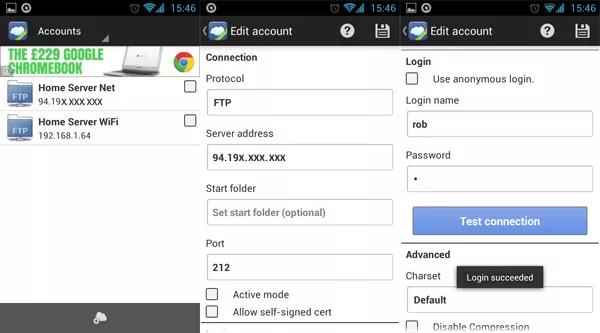
Open the FolderSync app on your Android device and select the accounts option, followed by the add icon at the bottom of the screen. Select FTP to proceed to the screen where you can enter the necessary settings.
Give the account a name, such as “Home Server WiFi,” and then enter the IP address you obtained in the preceding steps. Except for the username and password you created earlier, leave everything else blank. After that, you can test the connection; you should receive a message confirming that it was accepted. To confirm these settings, click the save icon in the top right corner.
If you encounter problems, try manually entering the port information (port 21 is the default) and adjusting the port settings through the server interface. If you’re still having problems, check your firewall settings and read the official network configuration guide.
Syncing and viewing files
The “file manager” option on the home screen allows you to browse, open, and download any files in your FTP server’s shared folders. However, if you want to set up automatic syncing, you must use the “Folderpairs” option.
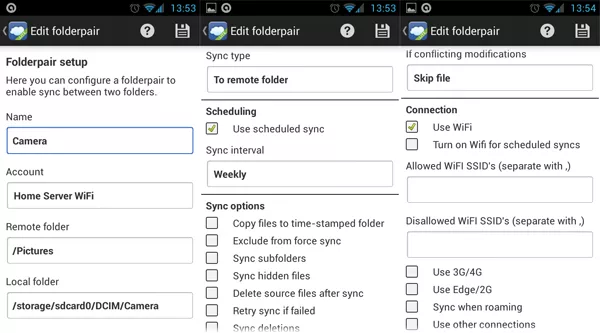
Use the Wi-Fi account you created to sync, and then select the remote folder you want to connect to on your PC. The local folder is the location from which you want to send or receive files on your smartphone/tablet. The sync type is probably the most important field here; you can either send data to the remote server only (upload to your cloud), receive data only to the local folder (download data from your cloud), or have the folder work both ways, with any data added to one folder automatically being added to the other. I chose “to remote folder” for my camera syncing, so that my photos are automatically sent to the FTP server.
You can then specify regular syncing intervals, as well as whether to use Wi-Fi, 3G, or roaming connections. To reduce syncing times, I recommend disabling old file overwriting.
If you want to keep things organized automatically, the option to copy files to a time-stamped folder is a nice touch. Any new pictures will be automatically sorted by date every time the files sync. However, if you use the sync deletions option in two-way mode, deleting something on your server will also delete it from your phone, and vice versa. It’s a useful feature for managing files, but use it only after you’re confident that everything is in order.
When you’re finished, click the save button in the top right, then refresh to force sync the two folders and ensure that everything is working properly.

Feel free to configure multiple paired folders to sync files and folders at various intervals. The possibilities are nearly endless. And don’t forget that you don’t have to sync automatically; if you prefer, you can simply manage your cloud data through the file manager.
That’s all there is to it; you can now wirelessly transfer files in your own home and never have to worry about dragging pictures from folder to folder again.
Configuring for Internet usage
So, hopefully, you’ve synced a few folders between your smartphone and PC by this point, but what if you need to access your cloud storage system while you’re out and about? You can do the same thing by adjusting a few settings, but be aware that some routers aren’t very accommodating when it comes to allowing Internet connections through their firewalls.
If you have a dedicated IP address, this will be a little easier; if not, you’ll have to ask Google what your IP address is, but keep in mind that it will most likely change when you restart your router. You can reconnect to your server using your internet IP rather than your LAN by creating a new FolderSync account.
If you can’t connect, there are a few things you can try, starting with bypassing your router’s firewall. You’ll need to access your router’s settings, which you can usually do by typing something like 192.168.X.XXX into your browser. The information is usually found at the bottom of your router.
You can either experiment with port forwarding if you know what you’re doing, or you should be able to find something called DMZ. Assign this to your PC host server, and it will be placed outside the firewall of your router.
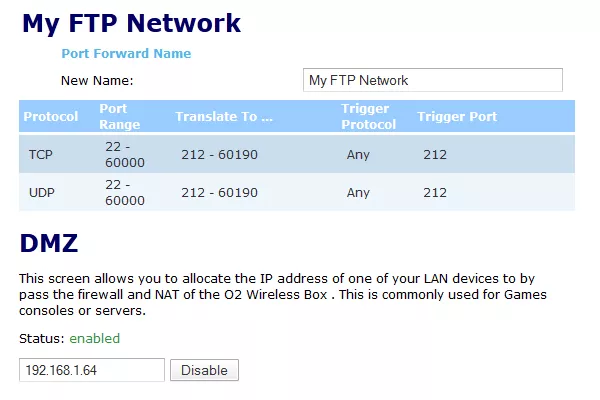
Second, reassigning the default port in the Filezilla server options can help you avoid issues with routers blocking specific ports. Change the port field to something greater than 21 by clicking “edit,” then “settings.” I discovered that 212 worked perfectly for me. You’ll need to change these settings in your FolderSync accounts, but simply edit the accounts you created earlier and manually enter the port number.
Connecting via Internet rather than Wi-Fi works exactly the same way, and if you want to set up automatic syncing, follow the same steps as before, but select your internet IP rather than your Wi-Fi account. Although I wouldn’t recommend automatically syncing larger folders because you could quickly exhaust your monthly data allowance. Instead, this is probably best suited for file management and on-demand access.
If you’re still having trouble connecting to the Internet but your Wi-Fi is working fine, the issue is most likely related to your firewall settings. Of course, I can’t account for the hundreds of different routers you’ll all have, so keep looking until you find something similar to my example above or perhaps consult this port forwarding guide for your specific router.
Security
If you intend to make your files available on the internet, you will undoubtedly require additional security. Because standard FTP connections are not encrypted, someone could theoretically monitor the connection and deduce your password. Although the chances are slim, it is always better to be safe than sorry.
Filezilla and FolderSync, fortunately, support SSL/TSL encryption, which prevents eavesdropping on your connection. Simply go into Filezilla’s settings and click on the SSL/TSL field to get started. You must create a new certificate and save it somewhere safe. To do so, click the generate button at the bottom and enter your two-digit country code, city, and email address. You can find your country code by clicking here.
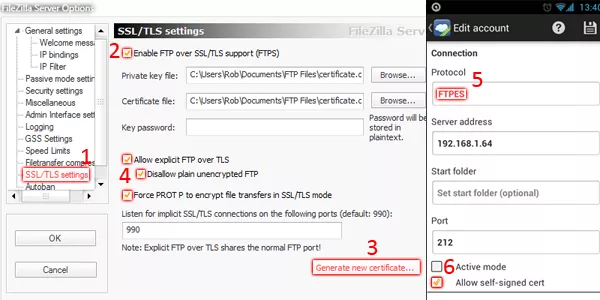
Click browse at the bottom to select a location for your certificate, then press generate. Now all that remains is to disable non-encrypted connections by checking “disallow plain unencrypted FTP” and forcing PROT P.
Finally, return to FolderSync and click accounts once more. Re-test your connection after changing the protocol to FTPES and checking the “allow self-signed cert” box. These settings must be applied to WiFi and internet connections, but your own cloud server is now much more secure against unauthorized users.
Is home FTP for you?
I must emphasize that there are distinct advantages and disadvantages to both local and other cloud storage solutions. To begin with, as previously stated, the main advantage of using your own Wi-Fi network is that transfer speeds are fast, and syncing between multiple devices is nearly instantaneous. Uploading and downloading from cloud storage services, on the other hand, takes considerably longer. You also have complete control over the content that remains on the server, and you can set up daily or weekly sync schedules. Best of all, you no longer have to deal with USB cables, dragging and dropping files, or vexing software suites like Samsung’s Kies.
However, when you’re away from home, transfer speeds are obviously significantly reduced, defeating much of the purpose of using a Wi-Fi-based storage system. If you want to use your FTP server as a anywhere cloud storage solution, you must consider the additional cost of leaving your PC on all the time, in which case you may be better off sticking with Dropbox. FTPs are also not ideal for sharing content with others because you must still upload your files via email or a social media site.
Of course, if your computer ever stops working, you won’t be able to re-download your files from the web, but if you’ve synced between two or more devices, this shouldn’t be a big deal.
I prefer having my own cloud computing system, and I doubt I’ll use Google Drive as much in the future. If you’re looking for a convenient wireless syncing solution or are tired of exceeding cloud storage limits, it’s well worth your time to set one up. If you have any issues, please leave a comment below and I will do my best to assist you.